Last month I fought out a battle from Aaron’s Mediterranean Ancient Campaign, 224 BC. See his blog for details of the campaign. This is the long overdue report of said action, played solo with To the Strongest! rules, and 150 point armies, each divided into 4 Commands.
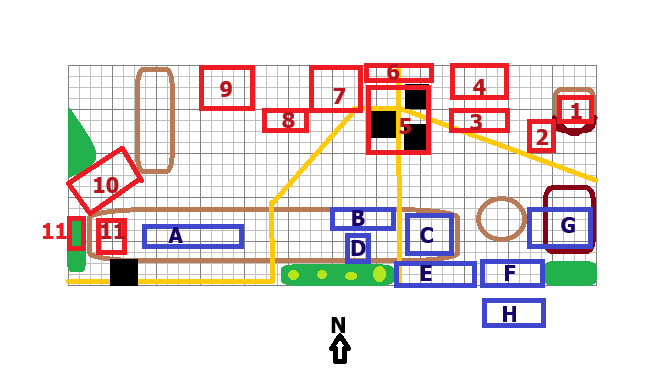
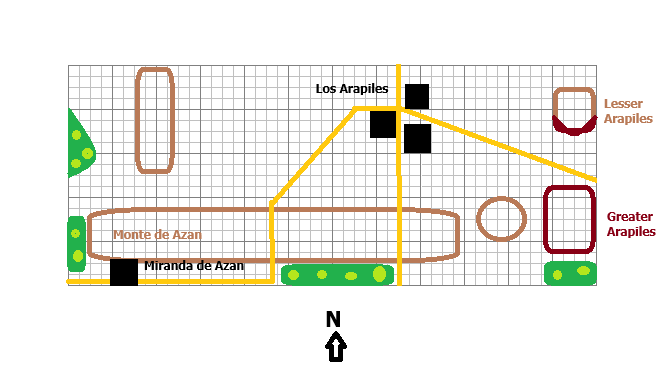
Initial set up – Galatians near, Macedonians far.
Bitorix and the Galatian left flank Cavalry command.
|
CMD
|
Description
|
Save
|
Spec/Ammo
|
Pts
|
VM
|
|
1
|
Left Flank Cavalry – Bitorix Tectosages
|
|
|
|
|
|
1
|
General, Mtd, Heroic
|
3+
|
Replay
|
6
|
2
|
|
1
|
Cavalry, Javelin – Hero
|
7+
|
2
|
10
|
2
|
|
1
|
Cavalry, Javelin
|
7+
|
2
|
9
|
2
|
|
|
|
|
25
|
6
|
Smertomara and the left center Infantry command – 4 warbands, with one of them Veteran (red ring).
|
CMD
|
Description
|
Save
|
Spec/Ammo
|
Pts
|
VM
|
|
2
|
Left Center – Smertomara Uindia
|
|
|
|
|
|
2
|
General
|
2+
|
Replay
|
4
|
2
|
|
2
|
Warriors, Deep
|
7+
|
Free Hero
|
10
|
3
|
|
2
|
Warriors, Deep
|
7+
|
Free Hero
|
10
|
3
|
|
2
|
Warriors, Deep, FANATIC!
|
8+
|
Free Hero
|
11
|
3
|
|
2
|
Warriors, Deep, Veteran
|
6+
|
Free Hero
|
13
|
3
|
|
2
|
LI Javelinmen
|
7+
|
|
4
|
1
|
|
|
|
|
|
|
|
|
|
|
52
|
15
|

Tectomaros and the right center infantry command. The unit on the far right belongs to Smertomara, and are Fanatics (blue ring). I had never used a Fanatic unit before – they hit on a 6+ even when disordered, but their Save number is one worse.
|
CMD
|
Description
|
Save
|
Spec/Ammo
|
Pts
|
VM
|
|
3
|
Right Center – Tectomaros Drunemetron
|
|
|
|
|
|
3
|
General
|
2+
|
Replay
|
4
|
2
|
|
3
|
Warriors, Deep
|
7+
|
Free Hero
|
10
|
3
|
|
3
|
Warriors, Deep
|
7+
|
Free Hero
|
10
|
3
|
|
3
|
Warriors, Deep, Veteran
|
6+
|
Free Hero
|
13
|
3
|
|
3
|
|
|
|
|
|
|
3
|
LI Javelinmen
|
7+
|
2
|
4
|
1
|
|
3
|
LI Javelinmen
|
7+
|
2
|
4
|
1
|
|
Camp
|
|
|
1
|
3
|
|
|
|
|
46
|
16
|
Olorix and the right flank Galatian Cavalry Command.
|
CMD
|
Description
|
Save
|
Spec/Ammo
|
Pts
|
VM
|
|
4
|
Right Flank Cavalry – Olorix Rigosages
|
|
|
|
|
|
4
|
General, Mtd, Heroic
|
3+
|
Replay
|
6
|
2
|
|
4
|
Cavalry, Javelin, Veteran
|
6+
|
3
|
11
|
2
|
|
4
|
Cavalry, Javelin – Hero
|
7+
|
2
|
10
|
2
|
|
4
|
|
|
|
|
|
|
|
|
|
27
|
6
|
GALTIAN 150 pts VM 43/3 = 14
Hippolochos and the left flank Macedonian cavalry command.
|
CMD
|
Description
|
Save
|
Spec/Ammo
|
Pts
|
VM
|
|
1
|
Left Flank Cavalry – Hippolochos
|
|
|
|
|
|
1
|
General, Mtd, Heroic
|
3+
|
Replay
|
6
|
2
|
|
1
|
Cavalry, Javelin, Veteran
|
6+
|
3
|
11
|
2
|
|
1
|
Thracian Light cavalry, Javelin
|
7+
|
2
|
5
|
1
|
|
1
|
Thracian Light cavalry, Javelin
|
7+
|
2
|
5
|
1
|
|
|
|
|
27
|
6
|
Leocharis and the left center infantry command
|
CMD
|
Description
|
Save
|
Spec/Ammo
|
Pts
|
VM
|
|
2
|
Left Center – Leocharis
|
|
|
|
|
|
2
|
General
|
2+
|
Replay
|
4
|
2
|
|
2
|
Pikes, Deep Hero
|
7+
|
First strike
|
14
|
3
|
|
2
|
Pikes, Deep
|
7+
|
First strike
|
13
|
3
|
|
2
|
Thracian Javelinmen, xtra 2HCW
|
7+
|
2
|
8
|
2
|
|
2
|
LI Javelinmen
|
7+
|
2
|
4
|
1
|
|
2
|
LI Slingers
|
8+
|
3
|
4
|
1
|
|
|
|
|
47
|
12
|
Autodikos and the right center Macedonian infantry command.
It is best not to speak of his Latin cousin, Biggus Dikus!
|
CMD
|
Description
|
Save
|
Spec/Ammo
|
Pts
|
VM
|
|
3
|
Right Center – Autodikos
|
|
|
|
|
|
3
|
General
|
2+
|
Replay
|
4
|
2
|
|
3
|
Pikes, Deep Hero
|
7+
|
First strike
|
14
|
3
|
|
Pikes, Deep Hero
|
7+
|
First strike
|
14
|
3
|
|
3
|
Thracian Javelinmen, xtra 2HCW
|
7+
|
2
|
8
|
2
|
|
3
|
LI Javelinmen
|
7+
|
2
|
4
|
1
|
|
3
|
LI Slingers
|
8+
|
3
|
4
|
1
|
|
Camp
|
|
|
1
|
3
|
|
|
|
|
49
|
15
|
Periandros and the right flank Macedonian cavalry command; the red ring denotes a Veteran unit.
|
CMD
|
Description
|
Save
|
Spec/Ammo
|
Pts
|
VM
|
|
4
|
Right Flank Cavalry – Periandros
|
|
|
|
|
|
4
|
General, Mtd, Heroic
|
3+
|
Replay
|
6
|
2
|
|
4
|
Cavalry, Javelin, Veteran
|
6+
|
3
|
11
|
2
|
|
4
|
Thracian Light cavalry, Javelin
|
7+
|
2
|
5
|
1
|
|
4
|
Thracian Light cavalry, Javelin
|
7+
|
2
|
5
|
1
|
|
|
|
|
27
|
6
|
Macedonian 150 pts VM 39/3 = 13
Macedonians go first; left flank situation after each command takes a group March move.
same on the right. Somebody left their Hero behind!
Situation after the first Thracian turn.
Situation after the second Macedonian Turn,
and after the 2nd Thracian Turn.
Macedonian Turn 3 – General Periandros moves his cavalry forward on the Macedonian Right; the light cavalry in the woods chuck their Javelins at the opposing Thracian cavalry as they move forward, and score a rare hit from missile fire, which the Thracian horse obligingly failed to save.
Situation in the Center after Macedonian Turn 3…note the ugly gap in their lines… a novel tactic, or a striking blunder?!
On the Macedonian Left, Hippolochos’s men balk at advancing any further at this time! “I’m fetta up with you losers”, shouts the General to his men!
The Thracians start of their Turn 3 in similar fashion, with their Left flank cavalry balking at moving forwards… or anywhere else, for that matter! General Bitorix bites his tongue, resisting the temptation to make a cheesy pun.
The Thracian center moves forward smartly, lead as it is by General Smertomara. Mind the Gap!
Thracian cavalry charges some Macedonian Light Cavalry; they are hit as their attempt to evade fails, but save, and then withdraw.
Second verse, same as the first – except this time the 2nd LC successfully evades.
General Olorix Rigosages moves up with his veteran horse, but another charge attempt by the original unit fails to materialize.
The action moves to the Thracian Right Center, where a lucky Javelin shot impacts the opposing Macedonian infantry sheltering in an olive grove.
Further advances by the Thracian Right Center end Thracian Turn 3.
Situation at the end of Turn 3.
Periandros and his veteran Companions successfully charge the Thracian cavalry opposing them, inflicting a hit, but the Thracians strike back successfully as well.
In the Macedonian Left Center, General Leocharis tries to do something about “The Gap”, leading a successful charge on the Fanatic (blue bead) Thracian Warband to their right front. Their covering Javelinmen hurl their missiles to little effect.
“First and 10, do it again!”.. with a pair of 10’s – one as an activation (a difficult move for a deep unit, so they needed a 8+; the Macedonians hit, but the Thracians save. The Thracians miss battling back, but a Hero finds an opening and and scores a hit, howevert the Macedonians save as well.
Battlefield overview, end of Turn 4 for Macedon.
Bitorix and his Thracian cavalry trample the opposing Macedonian LC, whilst a rally attempt by the other Thracian Cavalry fails.
Bitorix wheels his cavalry to threaten the flanks of the opposing Macedonian horse, but they then run out of energy to accomplish anything more for the time being.
Thracian Left Center: Smertomara Unidia leads a Veteran Warband in a charge (using his Replay on the initial Ace!) on the White Macedonian Phalanx; they hit but the Macedonians and their General both save.
The Macedonians hit on their battle-back, but the Warband and the General both save as well.
The two other Galatian warbands move forwards, but a follow up attempt at a charge falls short.
Galatian Right Center: Warbands advance to both sides of General Tectomaris Dunemetron, witht he Veteran (red bead) warband continuing on into the Macedonian LI Javelinmen.
The Javelins fail their evade, are hit in melee, and fail to save – 1 Macedonian Victory Medal lost!
Galatian Right Flank cavalry under Olorix Rigosages: He charges at the head of his veteran Cavalry, scoring a hit on the enemy; the opposing General saves, and in the Battle-back , orolix is hit and killed – 2 Galatian Victory medals lost! Galatian slingers shoot… and miss!
Far right Galatian Cavalry charge, but both Thracian LC evade successfully.
The original Veteran cavalry charges again, and both sides hit…and save. The initiative passes back to the Macedonians to start Turn 5.
Macedonian Right Flank – Periandros and his veteran Companions chargethe opposing Cavalry on the diagonal, but bot they and the Galatians fail to hit in the melee.
Thracian LC changes facing, but fails to complete their planned maneuvers thereafter!
For Hippolochos and the Left Flank Macedonian cavalry, turn 5 is brief, as the Companions pull back, a Javelin toss by the Thracian LC misses, and the Companions fasil; to activate a second time to Rally, even with the replay by the attached General.
Macedonian Left Center sees an important Rally success for the Thracian infantry in the woods.
A failed activation prevents further actions Leocharis’s command. .
Macedonian Right Center: General Autodikos seems, err, otherwise occupied, as the box with the Blue Phalanx fails whatever it was that it was attempting!

Galatian Turn 5 – Rally round the flag, boys we’ll rally once again, shouting
Bitorix Tectosages!
Speaking of Bitorix, he charges the LC in the woods with his Cavalry; they evade, but have no legal evade move, and are thus eliminated! (Rules note, being in Cover, they could have opted to stand for the charge, which would seem to have been the better choice!)
1 Macedonian Victory Medal lost!
Oh what a lovely flank; too bad Bitorix couldn’t pull of the charge despite 2 attempts (needing a “10”).
Middle Warband charges, and eliminates the Macedonian LI, who fail to evade or save – 1 more Macedonian Victory Medal lost!
Leftmost Warband tries the same thing, but the LI evade behind the (green) Thracians,.
The Warband continues its wild charge in to the Thracians, but fail to hit, then being hit on the battle-back, which they fail to save. Ouch! Those 2-handed Romphia chopper thingies are mean and nasty!
A second charge by the Warband fails to hit, but is itself hit on the Battleback, and fails to save. The farthest right Warband successfully pulls back it sLI skirmishers, but fails to move into “The Gap”. “Wait till next Turn!”
The action moves to the Galatian right Center. The veteran Warband charges, and hits. Rules note: Ordinarily Pikes always strike FIRST in frontal melee… except when the target is as deep or deeper than they., as is the case with the Warbands.
The Phalanx fails to hit back, even aided by a Hero.
Galatian Skirmishers pull back from in front of the Middle Warband; an attempt at a second charge by the Veteran Warband then fails.
The Leaderless Galatian Right Flank Cavalry charges (rules note – actually, with a “2”, they should have failed to activate, as being without a general makes all Activations for any but Light units more difficult); the Thracian LC fails to evade, is hit, and dispersed! Such are the fortunes of War!
The other Galatian Cavalry charges the Companions opposite it; they miss, and the Companions miss on the battle-back… that is, until a heroic feat by the Macedonian General Hippolochos disrupts the enemy, which they are unable to shrug off. Further Galatian activations fail.
Situation at the end of Turn 5.
Macedonian Turn 6: Hippolohos and his Companions charge, but fail to hit, even aided by the Generals heroism; The Galatian cavalry strikes back, but both the Companions and their General save.
Thracian Lc chuck Javelins at the opposing Galatians, but they save the hit! Further activation attempts are unsuccessful.
Macedonian left Center; a sling shot misses, and attempt by the Thracians in the woods to drive off the opposing LI fails. Just like that, and it is onto the 3rd command!
Thracians charge, and inflict a scend hit on the opposing Warband, which fails to save or hit on the battle-back! Aces end the turn for this command, and then the Macedonian Right Flank Cavalry. Uhf!
Galatian Left Center, Turn 6: Smertomara charges the White Phlanx, scoring a hit, the battle back misses, but prodigies of valor threaten to score, but are shrugged off by the battle lust of the Galatians.
Smertomara’s 2nd charge inflicts the third hit on the opposing phalanx, and it collapses, costing the Macedonians a big 3 Victory Medals. Smertomara’s boys surge forwards into the big gap in the Macedonian center. This cannot be good!
A second Warband surges forward in to The Gap. Things are looking grim for the Phalangites and thuei supports!
With 2 hits, the leftmost warband pulls back to lick its wounds. Then the far right Warband turns to flank the Yellow Phalanx. Smertomara’s boys fail to replicate the maneuver on the other side of The Gap.
Galatian Right Center: Warband’s charge hits but is saved, and the Phalanx’s battle-back also hits, but is not saved.
Rightmost Warband advances into yet another gap in the Macedonian battleline!
It turns to flank the Thracians in the woods, but the command then runs out of initiative.

Galatian Right flank cavalry – the charge in the center ends in disaster, as the Galatians fail to hit, but the Macedonians strike back hard, which is not saved – 2 Victory Medals lost by the Galatians. The other Galatian Cavalry chases the Thracian LC…
twice, but their horse are too tired for a 3rd attempt. Aces end the turn for the Galatian Left flank cavalry before they can accomplish anything.
Situation at the end of Turn 6.
Macedonian Right “Center”, Turn 7: Blue Phalanx’s attack results in an unsaved hit to both sides!
Thracians move up, but an attempt by the Macedonian slingers to occupy the woods to their right fails.
On the far right, the isolated Macedonian Companions move forwards and then turn towards the Center, whereupon their horses are too tired to proceed further this turn.
The Yellow phalanx smartly pulls back from the threatened flank attack, but the Thracians inn the woods are unable to face the Warband to its right.
On the far Left, Macedonian Companions rally off a hit, with inspiration from General Hippolochos.
They then about face, planning to chase down the Galatian cavalry. After moving forward one box…
They successfully charge the enemy in the rear, hitting twice (double hit cards for hitting a flank or rear in melee). The tough Galatians save both hits, BUT being hit in the rear, cannot battle back.
They manage a second charge, but fail to hit. Their exhausted horses are unable to mount a 3rd charge!
Overview of the battle at the end of Macedonian Turn 7.
On the Galatian left, and attempt to address the cavalry to their rear… does poorly!
Bitorix and his Warband turn to threaten the flank of the Macedonian Blue phalanx, but an attempt by the battered Warband on the left to pull back for a future rally attempt falls flat.
The Galatians have more success in the right center, where a flank charge by the rightmost warband obliterates the Thracians in the woods.
A rally attempt by the veteran warband is unsuccessful, and an attempted maneuver by the LI Javelinmen fails.
The Galatian cavalry turns to face Hippolochos and his Companions, ignoring the Thracian LC to their rear, but that is all they can manage, and Turn 7ends.
Overview of the Battlefield at the end of Turn 7. The Macedonians are in trouble in the Center, while their situation on the flanks looks better.


 Galatian Turn 5 – Rally round the flag, boys we’ll rally once again, shouting Bitorix Tectosages!


